
Damond Motorsports Drag Brake Kit Install Guide
WARNING:
By installing this Product, you understand that:
The buyer/user assumes all risk as to quality, performance and use of these products and agrees to hold DD2, Inc. DBA Damond Motorsports (“DM”) and its representatives not responsible for any injury, loss, or damage; including any and all incidental or consequential damages arising from the sale, installation, or use of our products.
Many parts are intended for “OFF ROAD ” and “RACING” applications only. It is suggested that State and Federal emission regulation be checked, to see whether or not this product complies with those laws. Read through the instruction guide thoroughly, before attempting this install. Do not install any components while the engine is running or shortly after the car has been running. Give the car some time to cool down. Failure to install this product correctly, or failure to remove/reinstall existing components correctly, could result in poor running conditions, or even component and engine failure, which the sole user of this product is responsible for. The install instructions are intended to guide you on how to install this product properly. Only an experienced mechanic should perform this install. In addition, DM, and its representatives reserve the right to modify and or discontinue parts without notice. If you the user/buyer of this product do not agree with the above, contact DM immediately, to discuss a possible return of our product for a full refund minus shipping costs, and other fees.
Tools Needed:
- Safe means of lifting and supporting the vehicle: jack and jack stands, wheel ramps, or lift.
- Torque Wrench
- Socket wrench or breaker bar
- Wheel Lug Socket
- 18mm socket (Ford)
- 17mm socket (Mazda)
- 15mm or 16mm socket (Mazda)
- 10mm socket
- 9/16" socket
- 1/2" socket
- 17mm open end wrench
- 10mm flare nut wrench
- 11/16" open end wrench
- 7/16" open end wrench
- 7/16" flare nut wrench
- Flathead screwdrivers and needle-nose pliers
- Wire brush
- Rubber Mallet
- Brake Fluid DOT3, DOT4 or DOT5.1 approximately 0.5L if just installing the kit, 1L for full flush
- Brake Bleeder and/or catch tank
- Medium strength thread locker
- 0.032" stainless steel lock-wire (optional)
- Teflon tape or thread sealing paste
- Feeler gauges
- Hammer
Components supplied should include:
2 x Wilwood Calipers
2 x Wilwood Rotor Hats(we machine the ID to clear the Mazda hub, or machine the 5x10⁸ PDC for the Ford hub)
2 x Wilwood Rotor Rings(blanks, directional HD 36, or scalloped)
2 x Wilwood Rotor Hat Mounting Bolts
1 x Wilwood Stainless Brake Line Kit
1 x Wilwood Brake Pad set
2 x Damond Caliper Brackets
4 x 9/16" bolts
4 x 9/16" washers
4 x thin stainless shims
2 x 8mm bolts and locknuts (Mazda only)
4 x 15mm or 16mm bolts (Mazda only)
Preparation:
Attach the rotor ring to the hat as shown using the provided 1/2" Wilwood bolts and washers, APPLY THREAD LOCKER. Tighten in a crisscross pattern to 155lbs/in. For an added measure of security, the bolts may be safety wired using standard 0.032 inch diameter stainless steel safety wire as shown in Figure 3. Please refer to Wilwood’s data sheet DS-386 (available at www.wilwood.com/Pdf/DataSheets/ds386.pdf) for complete safety wire installation instructions.
Apply Teflon tape to the tapered threads of the supplied brake line fittings.

Thread the fittings into the calipers and secure them so they point upward on how the calipers will be mounted. Since the thread are tapered tighten till tight, roughly 80-90lbs/in. DO NOT OVER TIGHTEN, this may damage the threads in the caliper.

Take the rubber grommets and slide them onto the brake lines. Next take the supplied brackets and work them onto the grommets. Start with a corner and turn the bracket on as shown:


Install:
Begin by safely lifting and supporting the vehicle in the air. The ensure proper brake bleeding, lift the vehicle evenly side to side and front to back on a level surface.
Remove the front wheels.
On the Mazda remove the brake line clip from the strut using pliers. On the Ford remove the 8mm bolt securing the brake line to the strut.

Loosen and remove the factory brake line fittings with a 10mm brake line wrench, and 17mm open-end wrench. Be sure to cap the factory brake hard line to prevent excessive fluid leaking.

Remove the brake line clip from the brake line mount using pliers.

Remove the 17mm (Mazda) or 18mm (Ford) factory brake caliper mounting bolts and remove the calipers and brake lines from the vehicle.

Remove the rotors (may require hammering)
Clean the hub with a wire brush or similar. Ensure the hub is free of any buildup.
Remove the 3 x 8-10mm brake shield bolts each side and remove the shield. You may wish to keep the dust shields if they do not interfere with the rotors or calipers.

Mount the Damond caliper bracket to the knuckle with the logo facing out as shown, use thread locker on the bolt threads. For Mazda, tighten the supplied bolts to 60lbs/ft. For Ford, tighten the factory bolts removed earlier to 100lbs/ft.

Mount the rotor to the hub, and secure it for now with a lug nut or two if possible. If you ordered the HD 36 Curved Vane Rotors, be sure you have the orientation of the rotors correct to the corresponding side of the vehicle.

Mount the caliper to the bracket using the supplied 9/16" bolts and washers with thread locker applied. Tighten to 40lbs/ft. NOTE: The washers must be installed, or the bolts may interfere with the rotor surface.

Install the pads into the caliper with the backing plate against the pistons and the friction material against the rotors. Install the pad retaining clip and bend the ends of the clip outward to ensure it is secure.


Rotate the rotor a few times around to ensure there's no excessive dragging.
Install the brake line to the caliper fitting and using a flare nut wrench tighten to roughly 70-100lbs/in.

Install the supplied adapter fitting to the factory hardline and secure the fitting with the supplied clip. Hold the fitting securely with a wrench while tightening the hardline fitting with a 10mm flare nut wrench.
Photo Needed
Next tighten the supplied brake line to this fitting. Hold the fitting securely with a wrench while tightening the brake line fitting with a flare nut wrench.
Photo Needed
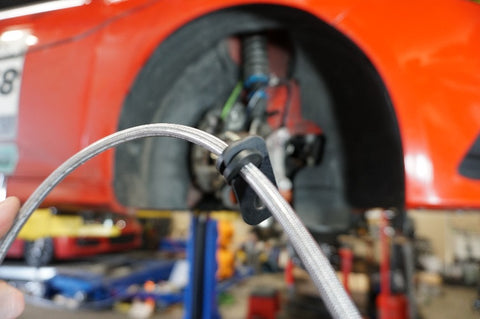
Secure the new brake hose to the strut bracket, as shown. For Mazda, drill a .25” diameter hole in the approximate location shown on the strut bracket and secure the line using the supplied 8mm bolt and locknut. For Ford, reuse the 8mm bolt earlier to secure the line to the strut.

Fill the brake reservoir with brake fluid and bleed the brakes.
There's 4 sets of bleeder screws per caliper, you'll just need to bleed the 2 bleeders facing upward. Begin with the right side INNER bleeder screw, tapping the calipers with a rubber mallet to help free trapped air. Then the right side OUTER bleeder screw. Repeat inner then outer on the left side of the vehicle.
Once the brakes have been fully bled of any air, lower the vehicle and start the engine. Ensure that the brake pedal is firm, and does not need to be pumped to build pressure. If the pedal needs to be pumped to build pressure, or the pedal feels "spongey," or the brake pedal sinks to the floor, you need to re-bleed the brakes.
Take the car for a brief test drive and properly bed-in the brake pads. Here's Wilwood's recommended pad and rotor bedding procedure.
Please note: This kit is intended for drag racing use only. This is NOT intended to multiple repeated braking applications from high speeds, brake boosting, or riding the brakes. Excessive brake use can lead to brake fade due to the lesser thermal capacity compared to the factory brakes.